No Knead Dutch Oven Bread
Uitgelicht onder: In een Handomdraai
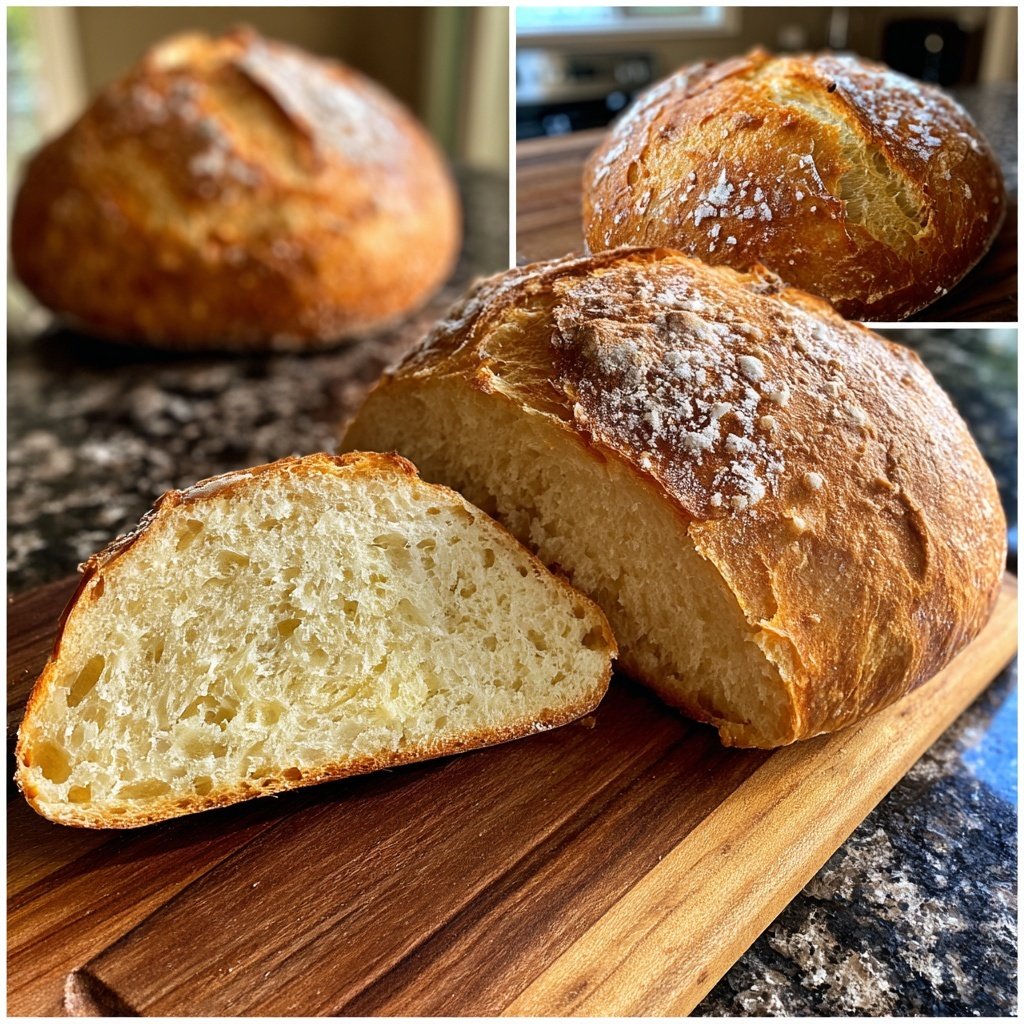
I’ve always wanted to make homemade bread but was intimidated by the kneading and rising processes. That’s why I was thrilled to discover the no-knead technique, which transforms a simple mix of flour, water, salt, and yeast into a crusty, flavorful loaf without the fuss. My first attempt resulted in a beautifully golden crust and a soft, airy crumb. With just a little patience, I learned that allowing the dough to rise slowly overnight enhances the flavor so much more than a quick method. This recipe is a game changer for any aspiring baker!
When I finally tried my hand at this bread, I was amazed at how easy it was. Admittedly, the long rise time had me skeptical at first, as I’m accustomed to quicker methods, but the patience truly paid off. The end result was a loaf that looked and tasted like it came straight from a bakery. I couldn’t help but slice into it fresh out of the oven, and the aroma was heavenly!
I also discovered that using a cast iron Dutch oven traps steam, creating a crust that’s incredibly crunchy yet tender inside. This technique is straightforward yet produces stunning results, making your kitchen the coziest place to be as the bread bakes.
Why You'll Love This Recipe
- Simple ingredients create amazing flavor
- Hands-off approach leaves you free to enjoy your day
- Perfect for beginners looking to impress
Understanding the No-Knead Method
The no-knead technique relies on a long fermentation process to develop gluten without the need for physical kneading. When you let the dough rest for 12-18 hours, the yeast gradually works its magic, creating air bubbles that impart a light texture and enhanced flavor. The key here is time: a longer fermentation allows for better yeast activity and more complex taste profiles in the final loaf. This method is incredibly forgiving, making it an ideal starting point for novice bakers.
If you're new to bread-making, one important point is patience. During the initial resting phase, don't rush the process. The dough should appear bubbly and puffy after the long rise, indicating that it has fermented well. If you notice that the dough hasn't developed adequately after 18 hours, consider warmer temperatures for the next rise. Place the bowl in a slightly heated oven (turned off) for 1-2 hours to speed up the fermentation.
Shaping Techniques
Shaping the dough is a significant step that affects both the aesthetic and structural integrity of your bread. When you turn the risen dough onto a floured surface, handle it gently. You want to preserve the air bubbles formed during fermentation, so avoid deflating the dough excessively. Use a bench scraper to help lift and fold the edges towards the center, forming a loose ball. Letting it rest for about 15 to 30 minutes before baking allows the gluten to relax, resulting in a better final shape and texture.
A great tip is to flour your hands and the surface well to prevent sticking. If the dough becomes too sticky, it's fine to dust with a bit more flour while shaping. Keep in mind that if you encounter overly tacky dough, you might have added a bit too much water; in such cases, you can adjust next time by slightly reducing the water in the initial mix.
Storage and Serving Suggestions
Once your no-knead bread has cooled, it can be stored properly to maintain its crusty exterior and tender crumb. I recommend wrapping it in a clean kitchen towel and placing it in a paper bag for optimal airflow. This method helps keep the crust crisp for up to 3 days. For longer storage, slice the bread and freeze the pieces in an airtight container or freezer bag, which can last up to three months. Thaw slices quickly in a toaster for fresh-tasting bread any time.
As for serving, this bread is not only delightful on its own but also complemented by various spreads and accompaniments. Try pairing it with olive oil, balsamic vinegar, or homemade dips. You can also slice it for sandwiches, toast it for breakfast, or serve it alongside soups and salads. It adapts well, soaking up flavors and enhancing every meal.
Ingrediënten
Ingredients:
No Knead Dutch Oven Bread Ingredients
- 3 cups all-purpose flour
- 1/4 teaspoon instant yeast
- 1 teaspoon salt
- 1 1/2 cups warm water
Make sure to measure your ingredients accurately for the best result!
Bereidingswijze
Instructions:
Mix the Dough
In a large mixing bowl, combine the flour, yeast, and salt. Gradually add warm water, stirring until a shaggy dough forms. Cover the bowl with plastic wrap and let it rest at room temperature for 12-18 hours, until the surface is dotted with bubbles.
Shape the Dough
Turn the dough onto a well-floured surface and shape it into a ball using floured hands. Let it rest while you preheat the oven.
Preheat and Bake
Preheat your oven to 450°F (230°C) and place your Dutch oven inside to heat. Once preheated, carefully transfer the dough into the pot, cover it with the lid, and bake for 30 minutes. Remove the lid and bake for an additional 15 minutes or until golden brown.
Allow the bread to cool on a wire rack before slicing to enjoy!
Professionele Tips
- For extra flavor, you can add herbs or cheese to the dough before the long rise.
Troubleshooting Tips
If your dough doesn't rise properly or appears too dense after baking, it might be due to expired yeast or an overly cold environment. Always check the freshness of your yeast, and consider warming your kitchen slightly during the rise. Conversely, if your loaf collapses, you may have overproofed it. Look for dough that has doubled in size without excessive bubbling that leads to structural failure.
Another common issue is a pale crust. To achieve that desirable golden-brown hue, make sure your Dutch oven is fully preheated. This initial high heat is crucial for crust formation. If your bread isn’t browning well, consider adjusting the baking time or lowering the lid slightly during the last 15 minutes to allow more airflow around the crust.
Ingredient Insights
The type of flour you choose plays a significant role in the texture of your bread. While all-purpose flour works perfectly, experimenting with bread flour, which has a higher protein content, can create a chewier texture and improve gluten development. Mixing in whole wheat or spelt flour can add depth and a nutty flavor, but be sure to adjust hydration levels as these flours absorb more water.
Using instant yeast is recommended for this recipe because it behaves consistently and requires no proofing, making the process easier. If you only have active dry yeast, simply activate it in a warm water mixture before adding it to the flour. This choice ensures that your dough will rise effectively without unexpected delays.
Vragen Over Recepten
→ Can I use whole wheat flour?
Yes, but the texture and flavor may vary slightly. You may need to adjust the water content.
→ How do I store the bread?
Store in a paper bag at room temperature for up to 3 days or freeze for longer storage.
→ Can I add seeds or nuts?
Absolutely! Adding seeds or nuts can enhance the flavor and texture of your bread.
→ Why is my bread dense?
A dense bread could be a result of not allowing the dough to rise long enough or not measuring ingredients accurately.
No Knead Dutch Oven Bread
Gemaakt door: Cressida Northwood
Recepttype: In een Handomdraai
Vaardigheidsniveau: Beginner
Eindportie: 1 large loaf
Wat je Nodig Hebt
No Knead Dutch Oven Bread Ingredients
- 3 cups all-purpose flour
- 1/4 teaspoon instant yeast
- 1 teaspoon salt
- 1 1/2 cups warm water
Stappen
In a large mixing bowl, combine the flour, yeast, and salt. Gradually add warm water, stirring until a shaggy dough forms. Cover the bowl with plastic wrap and let it rest at room temperature for 12-18 hours, until the surface is dotted with bubbles.
Turn the dough onto a well-floured surface and shape it into a ball using floured hands. Let it rest while you preheat the oven.
Preheat your oven to 450°F (230°C) and place your Dutch oven inside to heat. Once preheated, carefully transfer the dough into the pot, cover it with the lid, and bake for 30 minutes. Remove the lid and bake for an additional 15 minutes or until golden brown.
Extra Tips
- For extra flavor, you can add herbs or cheese to the dough before the long rise.
Voedingswaarde (Per Portie)
- Calories: 180 kcal
- Total Fat: 0.5g
- Saturated Fat: 0.1g
- Cholesterol: 0mg
- Sodium: 5mg
- Total Carbohydrates: 37g
- Dietary Fiber: 1g
- Sugars: 0g
- Protein: 6g